How to create a newsletter in word in the most detail?
How to create a newsletter in word? Microsoft Word is not only a tool that aids in word processing, but also the ability to create forms, such as surveys, evaluation sheets, contracts, or multiple choice sheets. This article will provide detailed instructions on how to create a full form on Microsoft Word!
Benefits of the tutorial:
– Make creating forms in Word easy, relevant, flexible and tight for different purposes.
– This tutorial is based on the Microsoft Word 365 version. Word 2010, 2013, 2016, 2019 versions can do the same.
Nội Dung Bài Viết
- 1 How to create a newsletter in word? Show the Developer tab on the Ribbon
- 2 How to create a newsletter in word? Create forms from existing templates or from blank papers
- 3 How to create a newsletter in word? Create content fields for forms
- 4 How to create a newsletter in word? Set protection permissions for forms
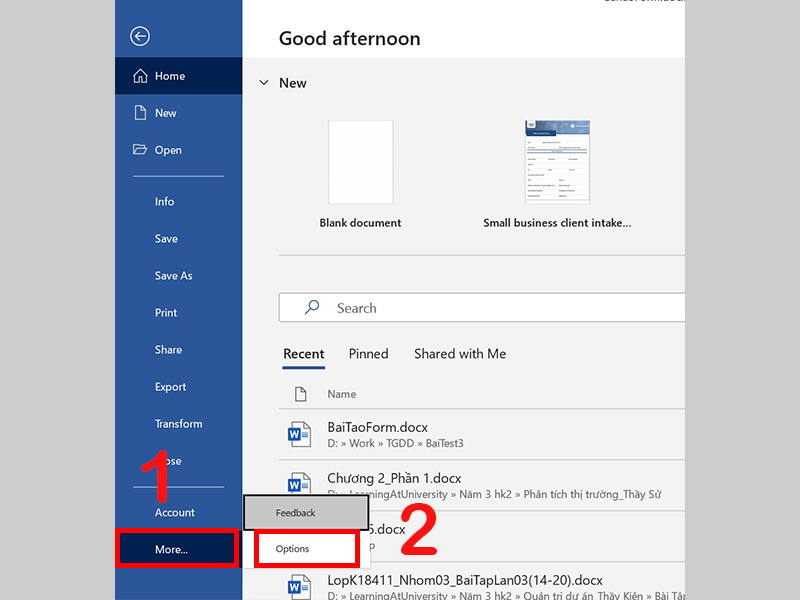
Step 1: Go to the file > select Options.
If you don’t see Options, go to More > select Options.

Go to the file > select Options
Step 2: Select Customize Ribbon > Check the Developer tab > Click OK.

Display the Developer tab on the Ribbon
– Method 1: Create a form from an existing template
Step 1: Go to the file > Select New > Type “form” in the search box and press Enter.

Find available form templates
Step 2: Click on 1 available template.

Click on 1 available template
Step 3: Click Create.

Select Create to use an existing template
– Method 2: Create a form from a blank paper
As a small example, to create a whitebook form, it is necessary to create a framework with fields such as: My Name, Photo, Gender, Birthday, Interests by manual operations.
Go to File > Select New > Select Blank Document > Create 1 form frame.

Create form from blank page
Place your cursor where to add > Select the Developer tab > Select the field type to add in the Controls group.

The first step is to create content fields for the form
Where:
+ Plain Text data field: This is a text field, which helps users enter text. For example, in the Full Name section, the selected field is Plain Text.
Notes:
– Text controls are of 2 types: Plain Text and Rich Text.
– Rich Text makes it possible for users to format bold, italicized or underlined text, allowing users to type multiple paragraphs of text.
– To limit the formatting that users enter text using Plain text will be more appropriate, when using Plain Text, users will only be able to type on text fragments.

+ Picture data field: This is a field that helps users include image data, for the example in the article, the part that uses Picture data is Image.

Create a Picture data field
+ Check Box data field: This is the data that allows users to tick a box, more specifically a square in the Gender section shown under the image.

Create Check Box data field
+ Date Picker data field: This is a time checkbox, data that allows users to enter or select days, months, years, examples such as the Date of Birth section in the picture.

Create Date Picker data field
+ Drop-Down data field: This is how to create a list and allow the user to select one of the provided lists.
Step 1: Place your cursor where you want to insert the Drop-Down > Select the Developer tab > Select the Drop-Down icon > Select Properties .

Create a Drop-Down data field
Step 2: Enter the name Title > Select Add.

Fill in the Title for the Drop-Down
Step 3: Enter the text for the user to select > Click OK > Select OK.

Enter the text for the user to select > Click OK > Select OK
To add a list of selected contents in the Drop-Down section, you need to repeat the actions as step 2, step 3 above.

Result after adding selections in the Drop-Down section
Use the Restrict Editing command to limit the permissions and extent to which forms can be edited or formatted for other users.
On the Developer tab > Select Restrict Editing.

Image select Restrict Editing
+ In section 2. Editing restrictions
Choose Allow only this type of editing in the document > Choose Filling in forms.

Editing restrictions setting image
+ In section 3. Start enforcement
Select Yes, Start Enforcing Protection > Enter password > Enter authentication again > Click OK.

Start enforcement setting image
Instructions on how to create a form on Word are completed. We hope it will be useful to you. Thank you for watching and wish you success in using Microsoft Word.
Word -How to copy a table in word keeping the simplest format
How to continue numbering in word for all versions?
How to sort a table in Word is very simple?
How to see word count on google slides, Docs?
How to save word doc to desktop in Windows 10?
How to save word doc on mac is very simple, super easy to understand
How to remove table formatting in word?