How to insert table of figures in word automatically
How to insert table of figures in word? Certainly, image and table captions serve as descriptive lists along with page numbers, allowing readers to easily locate the position of tables and images. The following article will guide you on how to create a table of figures and tables in Word on your computer, simplifying the process.
– List of tables and images is an indispensable part of any thesis, dissertation, scientific research paper.
– Creating lists of tables and images in Word with support tools not only helps to manipulate faster but also ensures absolute accuracy when any changes occur.
– The following article was made on Word 2016. On Word versions 2007, 2010, 2013, 2019, 365 you can do the same.
Nội Dung Bài Viết
How to insert table of figures in word? Create an automatic table of contents for a table
Step 1: Add a description to your table
Click the entire table, on the toolbar:
Go to References > select Insert Caption.
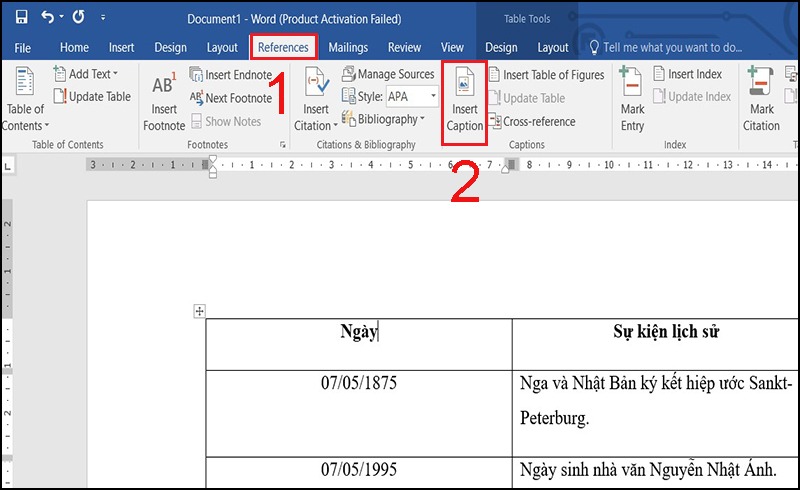
Add a description to your table
Step 2: Create generic labels for your table
Select an existing label, or click New Label to add a new label.
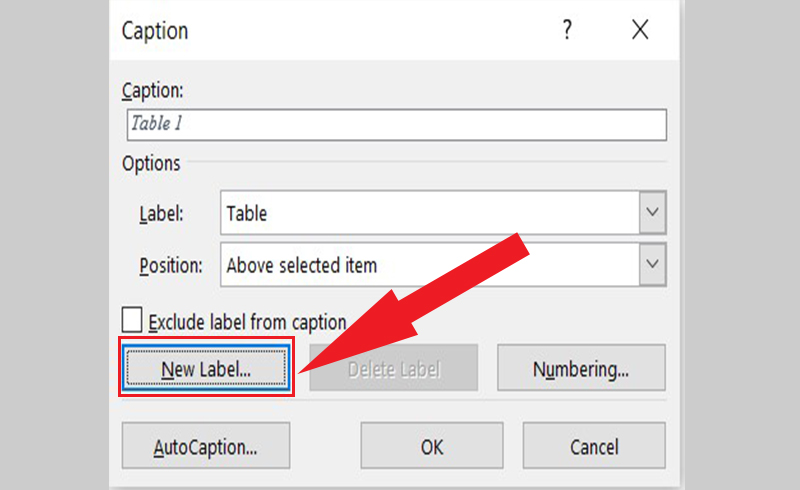
Create generic labels for your table
Note:
By default, Word has 3 labels: Figure, Table, Equation, if you use the Vietnamese version, just select Shape, Table or Chart without adding a new one.
Enter a name for the label you just added> Click OK.

Enter a name for the additional label
Step 3: Choose a numbering style for the table
In Insert Caption, choose Numbering.
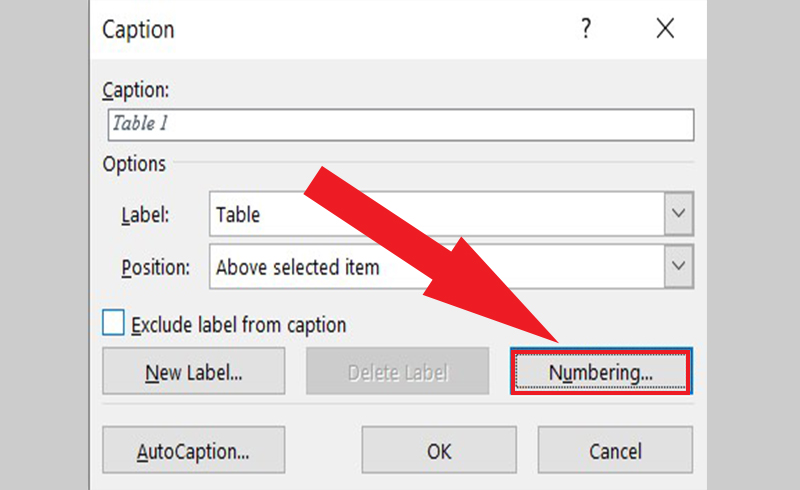
Choose a numbering style for the tablev
Select the type of number format you want in Numbering > Click OK.
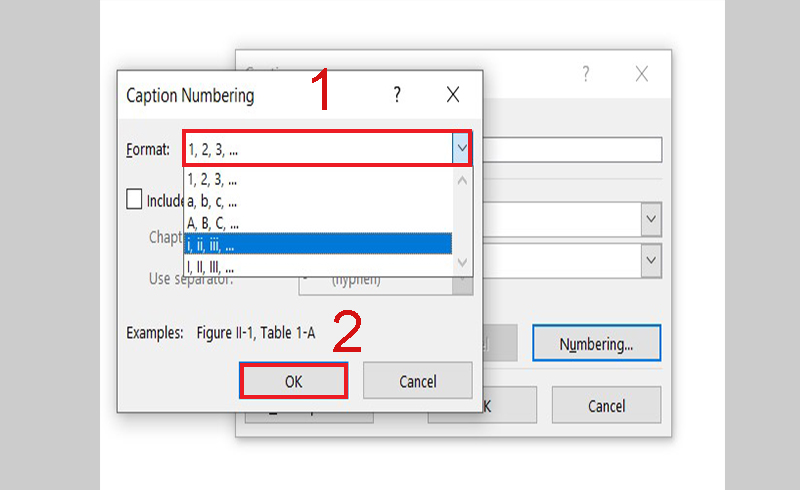
Select the type of number format you want in Numbering > Click OK.
If you want to choose the number 1.1, 1.2,… period:
Select Include chapter number > In Chapter starts with style, select Heading containing the table> In Use separator select (period) > Click OK 2 times.
Note:
This step you need to choose the correct Heading and in the Word article there is a numbered Heading.
The heading must be typed from Home > Numbering (i.e. automatic numbering, if you type it manually it will display the form 0.1).
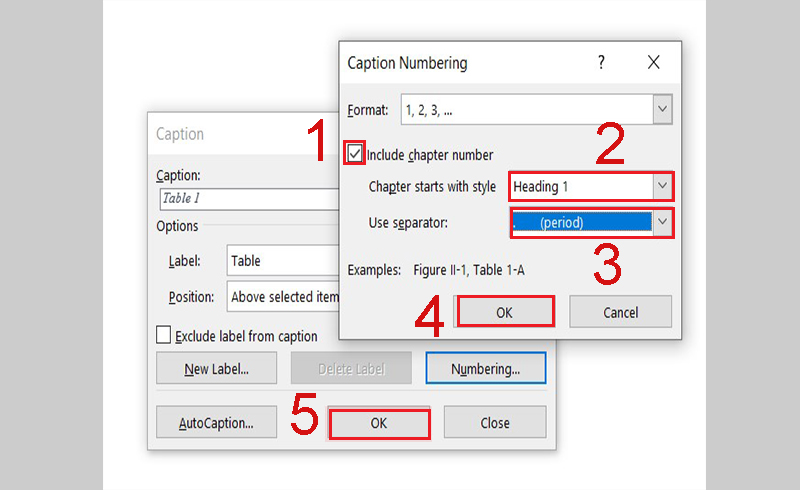
If you want to choose the number 1.1, 1.2,… period
Step 4: Choose the right font, font size, and typeface
Under Home > Expand the Style section and select Caption > Select Modify…
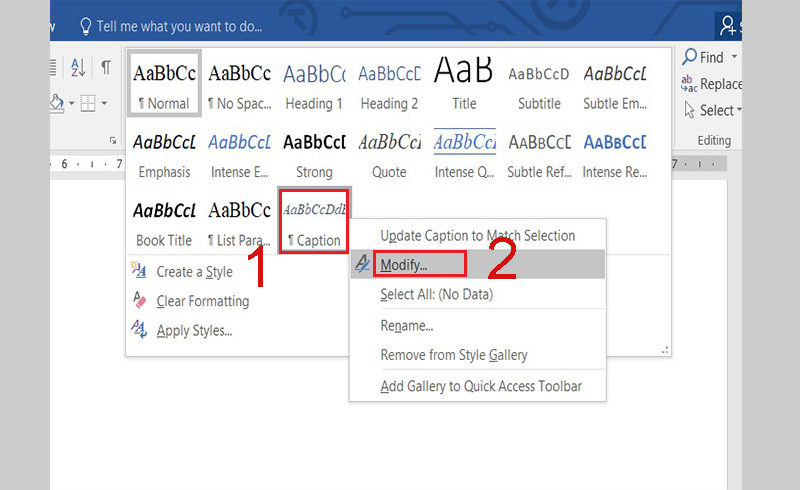
Choose the right font, font size, and typeface
Here you choose again the font, typeface, font size accordingly.
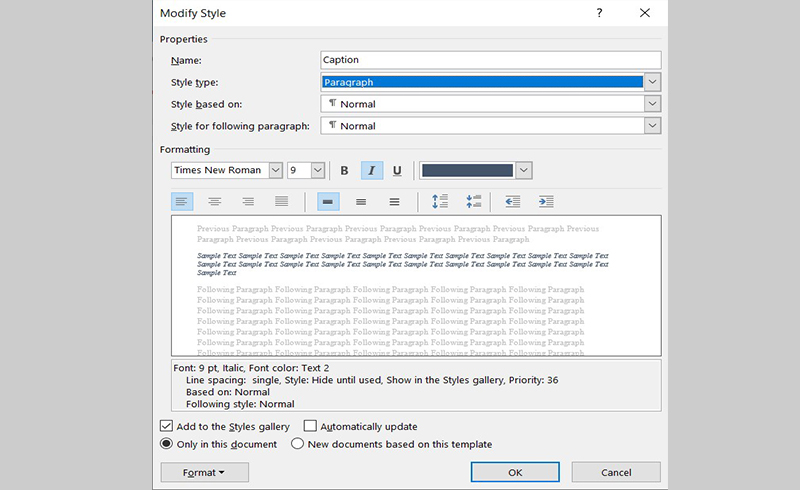
Here you choose again the font, typeface, font size accordingly.
Step 5: Create a table insertion area
Select the area where you want to insert the image category. Usually around the beginning of the text or the last pages.
To break the page, select Layout > Break > Page.
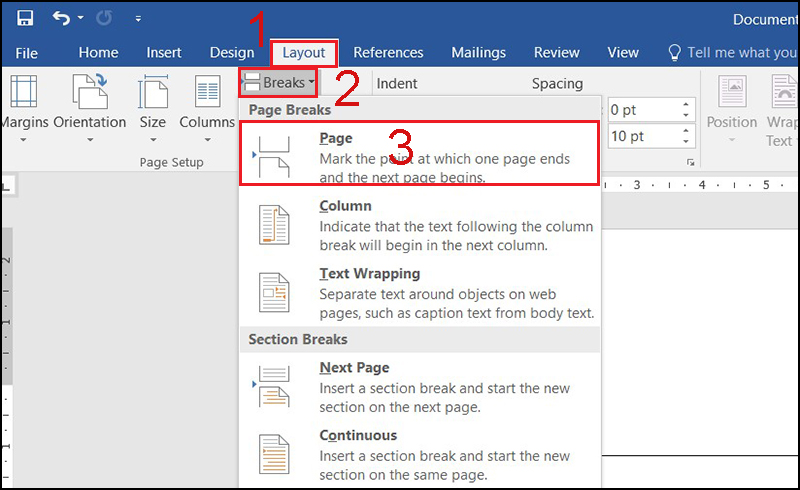
Create a table insertion area
Step 6: Insert table list into document
On the Reference tab, choose Insert Table of Figures.
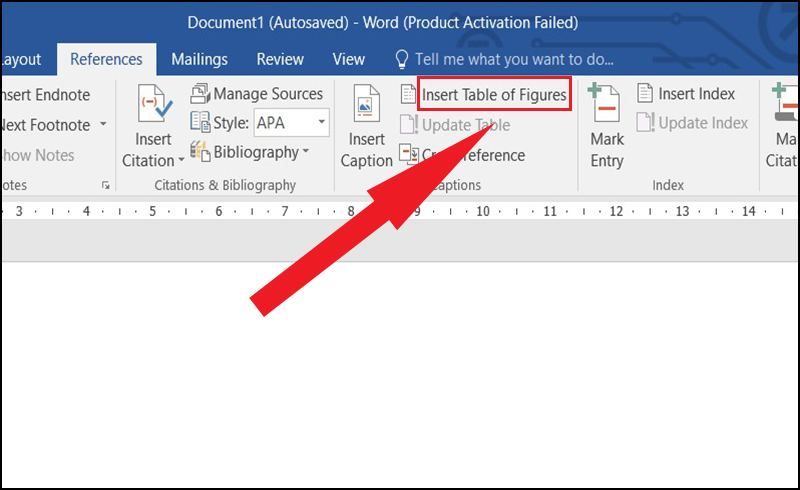
choose Insert Table of Figures.
In the Caption label, select the label you want to create the category > Click OK to finish.
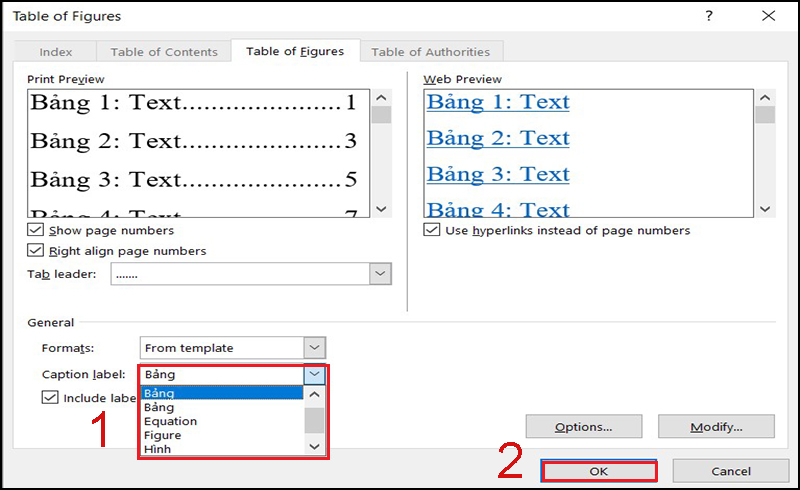
Click OK to finish
And here are the results of the table catalogue:

And here are the results of the table catalogue
How to insert table of figures in word? Create an image table of contents for images
Step 1: Add a description to the image
Tap the image you want to add a description to, on the toolbar:
Go to the References tab > select Insert Caption.
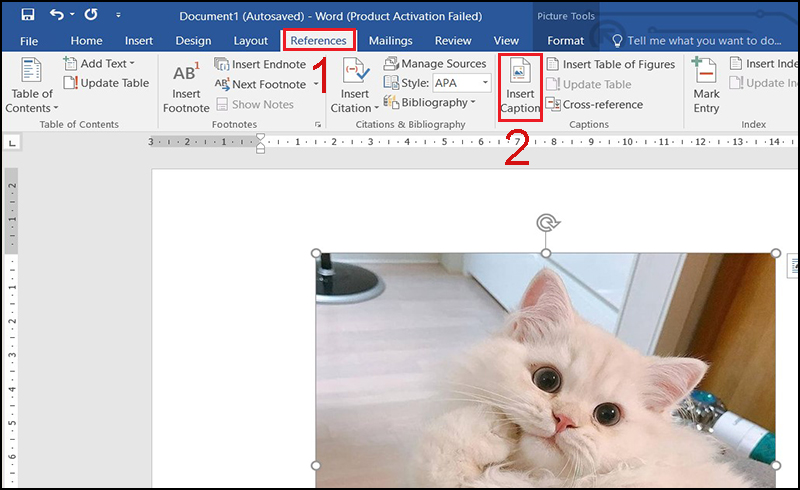
Add a description to the image
Step 2: Create generic labels for images
Select an existing label, or click New Label to add a new label.
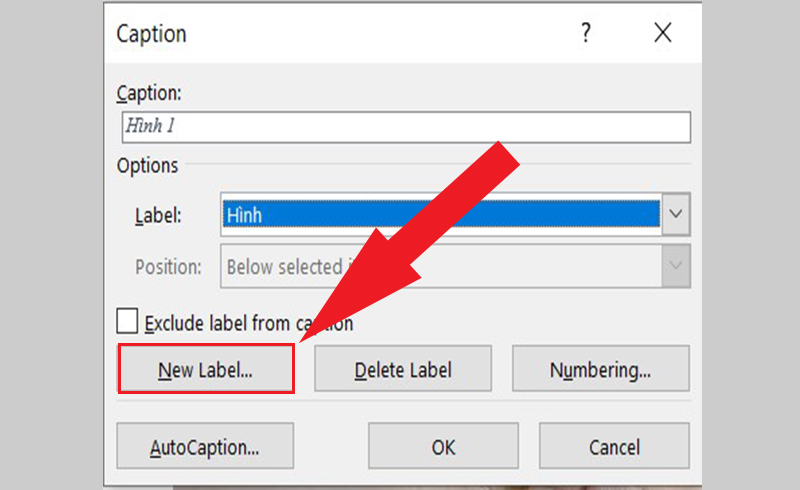
Create generic labels for images
Enter a name for the newly added image label > Click OK.
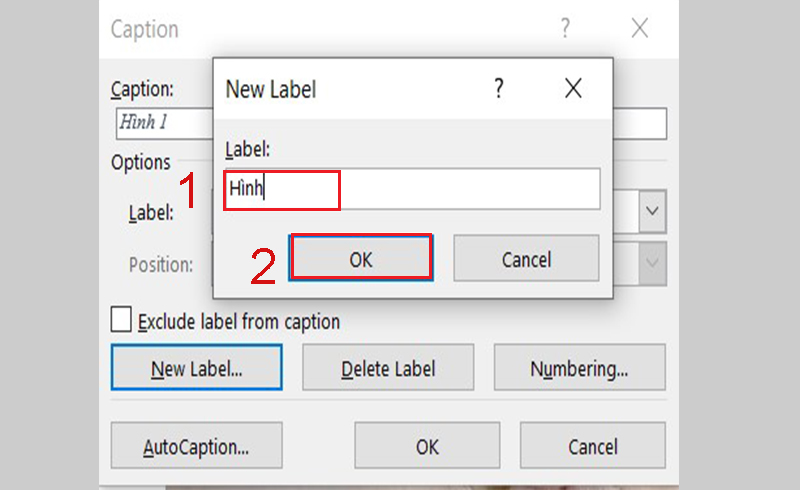
Enter a name for the newly added image label
Step 3: Choose a numbering style for images
In Insert Caption, choose Numbering.
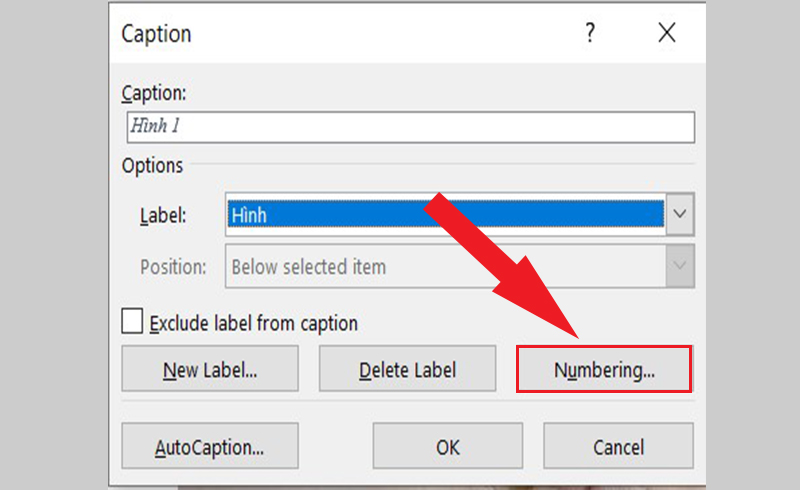
Choose a numbering style for images
Select the number format style for the picture you want in Numbering > Click OK.
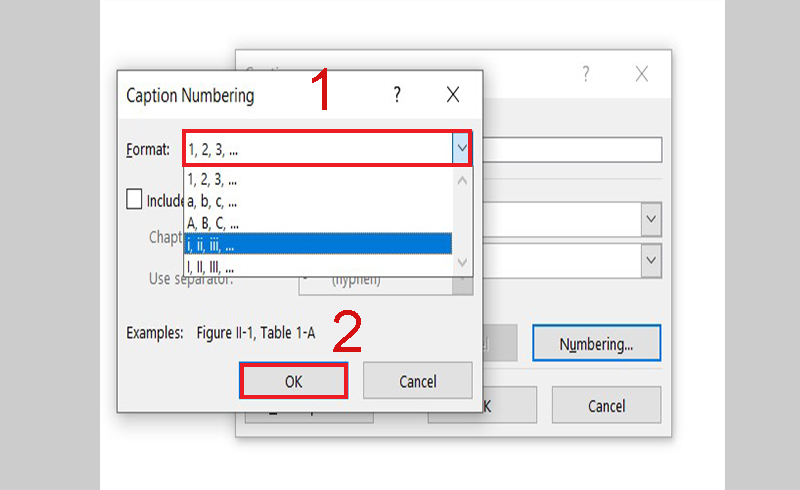
Select the number format style for the picture
Note: To format captions style 1.1, 1.2 you can refer to how 1 step 3 above.
Step 4: Choose the right font, font size, and typeface
In the Home > Expand the Style section and select Caption > Modify. Here you choose again the font, typeface, font size accordingly.
Step 5: Create an image insertion area
Select the area where you want to insert the image category. Usually around the beginning of the text or the last pages.
To break the page, select Layout > Break > Page.

Create an image insertion area
Step 6: Insert image catalog into document
In Reference, choose Insert Table of Figures.

In Reference, choose Insert Table of Figures.
In the Caption label , select the label you want to create the category > Click OK to finish.
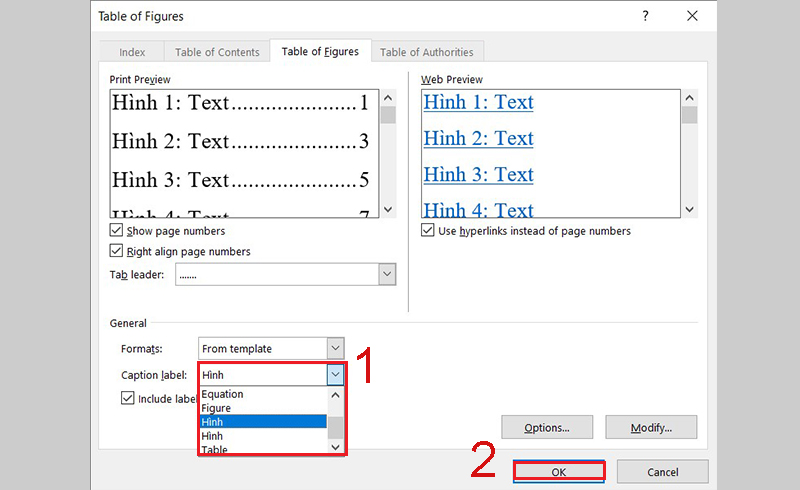
In the Caption label , select the label you want to create the category > Click OK to finish.
And here are the results of the image category:
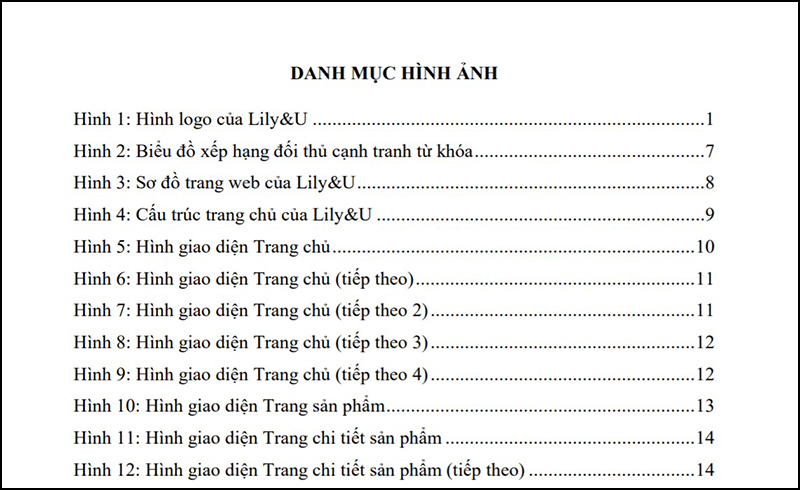
And here are the results of the image category
How to insert table of figures in word? The last article has shown you how to create a table of contents for tables and images in Word automatically. I wish you all success!
Word -How to insert an exponent in word quickly and simply
How to get more highlight colors in word 2007, 2010, 2013, 2016,…
How to check plagiarism on word 2010, 2007, 2013, 2016…
H ow to change page number font in word automatically extremely quickly?
How to change column width in word table
How to add caption to image in word any version
How to update all fields in word (with update time)